Weather Station Housing

I have a WMR200 and I have been looking at how I will set this all up to ensure that the rain gauge and temperature/humidity sensor record accurately as possible. I am going to put everything together as there is a place on the property which meets all the criteria for the different sensors.

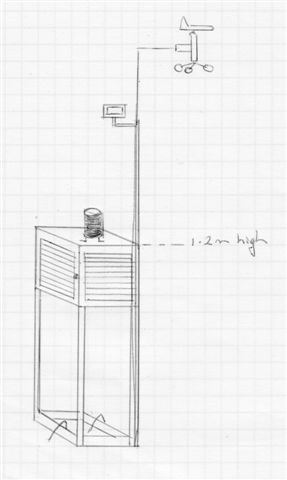
I am thinking about building a station house (for want of a better word) by getting an old louvre pantry door and using it to make a box which is approximately 1.2 metres above the ground to house my temperature/humidity sensor inside, putting the rain gauge on top, and the mast for the wind vane/anemometer attached to the side(see attached rough drawing). I will also attach my manual rain gauge to one side of the unit. I will use heavy duty pegs to secure it to the ground. I have used these pegs to secure other items to the ground and they can be easily pulled out with the right tools. The ground is clay so will hold well.

Considerations:

  • I understand that the rain gauge should be approximately 1 metre from ground level, and the temperature/humidity sensor should be around 1.5 metres from ground level so a compromise needs to be found. I was thinking the top of the box would be approx 1.2 metres from the ground.
  • The best location for the station is where I have to on occasionally drive thru (once or twice a year), so it needs to be movable.
  • I was thinking of making the roof of the box flat so I can put the rain gauge on top, but I am not sure if it should really be sloping. I can still install the rain gauge on the top with different length feet.

Hopefully you all will give me your thoughts on my idea.


WeatherStation.jpg

Your drawing is very good, but I would suggest another place for the rain gauge. WMO recommends 1 meter above ground, but you have it on a flat surface (and the idea that it is 1 meter above ground is that it is 1 meter higher as the flat surface from the ground).

Also, the pole may be a problem with winds, from retaining rain to make additional one if winds after the rain take the water on the wet pole to your gauge.

Probably the bests results would be to have the rain gauge separated from the set, or alternatively at almost the same height than the anemometer (as Davis sets do).

Do not take the recommendation for rain gauges at 1 meter strict: important is the distance to the flat ground. For thermo-hygro it is diferent: the height above ground is equally significant as the distance to the floor. In addition for rain gauges: absolutely nothing (also not an anemometer pole) should be in an 90

Although Davis shows the anemometer and rain gauge mounted together in their sales literature, the anemometer has its own independent mounting hardware and a long (around 40 feet/13 metres) cable. It is normal to mount the anemometer much higher than the rain gauge.

See this recent thread for a nice example of a home built Stevenson Screen.

Thanks Casacota and Niko…the home built Stevenson screen is very similar to what I was thinking although mine was going to be higher off the ground.

It looks like I have to rethink the rain gauge. The problem is that the rain gauge supplied with the WMR200 does not have a bracket to mount it onto a pole, it has a screw point on each of the 4 feet on the bottom of the gauge. I read that you want to ensure the gauge is mounted properly so that the wind does not shake it around causing bad readings. Based on this, I am wanting to secure all 4 feet. Can the rain gauge be mounted on the top of a farm fence post which is 130mm wide? I would still have to put a mount board (approx 160mm) on top of the post as the distance between the feet on the gauge is 140mm.

Sounds good to me.

I just posted my screen here http://discourse.weather-watch.com/t/40535

I chose to place the rain gauge in a different position to the screen as I have a slopping roof. Also I read that you should be careful in heavy rain that water droplets don’t bounce up off the flat surface into your gauge and give false readings.

awesome…looks similar to what I was thinking of building

That’s a good move asking in here Michelle - plenty of helpful folk explaining the reasoning too.

I use a fence post for my rain bucket device with a plate on top and levelled carefully.

Photos of various things here…

http://www.inmanavenue.com/sitephotos.html

I have made my enclosure for the temp & hygro differently to most others, and I have been very happy with the readings. Fan is running on 6V dc, but it is only 10m from the house and a power supply!

Cheers

Graeme

Another aspect is that the bottom from the shield should be open for the air, but closed for the ground radiation. Here an old schematic drawing from an official WMO screen widely used in Europe (Galbis type), maybe interesting as inspiration source for do it yourself projects:

Yes, I have something very much like that arrangement.
My WMR200 rain gauge is mounted on a short length of 150mm wide board, which is attached to the top of a (cut down[1]) 100mm square fence post set in grass.

[1] UK recommendations for rain gauge height seem to be a lot lower than in some other countries. The top of mine is set at around 600mm, I’d probably have it a bit lower if I was confident that I’d keep the grass around the post more tidy! :oops:

Hi all.
I have made this stevenson screen with wood and fan

http://users.otenet.gr/~meteo/project_stevenson-screen-box.html

And this radiation shield with fan

http://users.otenet.gr/~meteo/project_radiation-shield.html

I live out in the desert, and good shielding is, to me, way, way more important than placement of the rain gauge. (less than 1.5 in. of rain this year)

When I first set it up, i was always a little too hot. Took a month or two, but I worked out shielding that allowed me to float up, down, and in range of the stations in the 17 miles or so around me – allowing for microclimate variations I guess.

First off, I used a plastic Stevenson Shield. Purchased it, but the archives have very good write-ups on how to make them out of pot plant saucers.

I then purchased a 15" louvered door; much like the doors on closets etc. I cut the door into equal length 24" sections. I assembled it with the louvres pointing inward, and placed louvered sections on the top and bottom.

Direct sunlight was still a bit of an issue, so i got some scrap 1 inch styrofoam, used for insulation here in the desert. I attached it to the East, South (sun side) and west side of the louvered box. I allowed 2-3 inches at the bottom, one inch or so at the top for air circulation. Left the top and bottom sections open.

And I put the rain gauge on the top. Mounted it to a pole, with a pole brace mounted to the wall. Unfortunately I must place it about 2 ft from a west facing wall, which does get warm, especially in late afternoon. The Thermo/hygro unit is placed inside the purchased stevenson shield, and then this assembly is mounted inside the louvre box.

Is it accurate? Well, yes, mostly. I’ve used a calibrated thermometer as a control check. During the day, the temp variance between the 2 was less than .75F. Good enough for me. During the late afternoon, the variance was .95 -1.05F, again good enough that i can accept it. And the temps were always in the upper half or just slightly above, the local (17 miler’s) stations i trust. Since I border on the desert, I think it’s good enough to be a micro-climate variation. I am not fan aspirated yet.

Pictures are always better than words, I’ll try to get a shot or two in the next day or so and post it.

Ken
Maricopa, Sonoran Desert, Arizona

Thank you everyone for your very helpful replies. I am finding them very helpful. I think I will still build my stevenson screen using an old door and will put the rain gauge elsewhere. I am going to do the sensor in the jar, so it can go on top of the unit :slight_smile:

I would love to see a picture or too of your unit. One question, why assemble the louvres pointing inwards? Would it not be easier for the rain to get in?

So what you are saying is that it should have a bottom on it with air holes. Shame I cannot read the txt in the picture you provided.

I think I will insect treat it as well as the wildlife will find it a lovely home :lol:

The temp/humidty sensor has a mushroom dome which it screws into. I was thinking that I would remove this as it would create more air around the sensor.

Thas is catalan… an old book from 1922.

Holes on the bottom are important, better if no radiation from the ground comes in, only air. An insect treating is also very good, you may find else a complete zoo inside.

Also I would take away the dome shield. You will see that the humidity readings are much better and with less hysterese. I have also my automatic sensors inside the WMO shield without the dome that cames with, and the readings are now the same than the official psichrometer that sits also in the shield - whas not with the dome.

It matters less about ground radiation if the ground is always green grass (1600mm/year rain) and a fan is pulling ambient air through from adjacent all the time. It does matter if you have dry earth which re-radiates sun rays easily. My temperature is 2 degrees lower in summer than local reading and 0.5 to 1.5deg below other PWS in my area. I think mine does better than theirs and they both have stagnant air radiation shields. There is an old Davis report of comparisons of active vs passive radiation shields. Forced air movement is better and more responsive than passive Stevenson shields.

An aspect is that it doesn’t matter what system is better… fan or not fan. Surely with different criteria one can make different setups. Another important aspect is to know under wich conditions the measures where taken, and the official standard is a passive wooden shield after Stevenson or after Galbis, at 1.5m to 2m over ground. In some countries the ground must be grass, in others the natural ground from the zone (imagine a weather station with green grass around in a desert? that would affect at least humidity readings for sure).
For this reason I guess we have to search in our amateur possibilities the one wich is am closest to the official standards in our area, specially if we put our data online and probably also on real time nets.

These link has some interesting points it might help.

http://wattsupwiththat.com/2008/01/14/a-typical-day-in-the-stevenson-screen-paint-test/

http://gallery.surfacestations.org/main.php?g2_itemId=52

http://www.surfacestations.org/

Thank you Watanobbi…interesting temp differences depending on the paint surfaces…so white latex paint is the best it would seem. I am not sure of the durability of the latex paint and will probably go with a paint that is designed for our outdoor conditions. The sun is particularly harsh on paintwork here.

I was thinking of covering the grass directly under the weather station so I did not have to mow under there but it appears that I should leave it as grass and use the weed eater to cut the grass in this area. In the summer we get the afternoon sea breeze, and as the station is sitting at the top of the hill it should get good airflow thru it in summer. At this stage I am not planning in putting a fan in it.

I have been trying to determine what is the best size for my home built Stevenson Screen. I found a document on the internet which indicates that 700w x 530d x 600h

http://books.google.co.nz/books?id=lKU9AAAAIAAJ&pg=PA44&lpg=PA44&dq=stevenson+screen+dimensions&source=bl&ots=gQuiRfmqvy&sig=FCEAx6EjuXWc086EvJOQbBt5mSg&hl=en&ei=Q9FnSujjOo_WsQPBl9C0Bw&sa=X&oi=book_result&ct=result&resnum=9

Is there an official size?

I think the reasoning behind the larger units as used in official stations is so that duplicate manual equipment can be installed side by side with the electronic sensors for immediate comparison. So long as the roof section has a free air barrier with air movement (ie two layers) and even a foil reflective layer there too to eliminate direct radiation downwards; that the louvres in the side eliminate any light or direct horizontal radiation from nearby objects or late afternoon sun for example, but still allow a draft through it and that inside, that it is large enough to allow the hygro (temp and humidity) to have free breezes pass over it evenly then it can be a lot smaller.

Also thinking of side manual access for battery changes or whatever with a hinged side or rotated whole box on one lower edge hinge, and that it would be at the appropriate height and for NZ conditions over grass and away from pavement and buildings.

Graeme